
1. Introduction to Culturesquare stores/marketplace
Culturesquare provides you with a robust marketplace solution. It enables you to create and manage your own store within the market, allowing you to sell products to a broader audience.
2. Signing Up as a Seller
To become a seller on our Marketplace:
- Click on “Sell on Culturesquare“
- Read the instructions and faqs, and click on “Start Selling”
- Tick the Register tab, and tick the “I am a vendor” radio button
- Fill out the registration form with your correct details and enter your store name
- Submit the form for review.
Once your application is approved, you’ll receive access to your vendor dashboard.
2b. Vendor Dashboard
Vendor Dashboard gives you an overall summary of your store and activities. From this dashboard, you can easily manage your stores and get quick insights. Besides that, it will provide suggestions on how to make your store more appealing to your customers.
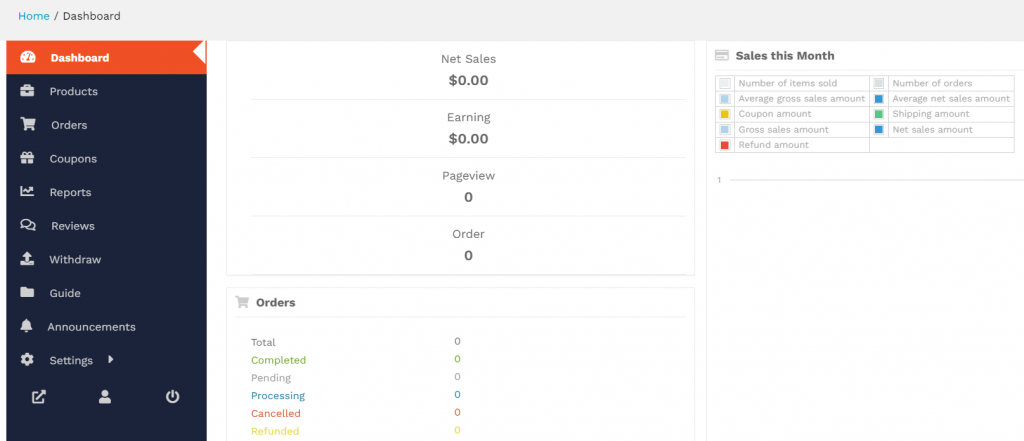
You can find an overview of your store, page view, orders, earnings, reviews, and products. There is also an announcement section. It displays all the latest notices or announcements from admin.
3. Store Setup
a. Store Settings
- Log in to your vendor dashboard.
- Navigate to the “Settings” section.
- Configure your store details, such as store name, description, contact information, and social media links.
b. Store Banner and Logo
- Go to the “Store Setting” section.
- Upload a store banner and logo to personalize your store’s appearance.
c. Store Policies
- Set up store policies including refund, shipping, and privacy policies.
- Provide clear information to customers regarding these policies.
4. Adding Products
a. Adding Simple Products
- Click on “Products” in your vendor dashboard.
- Select “Add Product.”
- Fill in product details such as title, description, price, and category.
- Add in product weight and dimensions so it can be shipping eligible
- Save the product.
b. Adding Variable Products
- Choose “Variable Product” when adding a new product.
- Configure attributes like size, color, etc.
- Set different prices and stock quantities for each variation.
- Add in product weight and dimensions so it can be shipping eligible
c. Managing Inventory
- Monitor and update your product stock levels regularly.
- Activate low-stock notifications to avoid running out of products.
5. Order Management
a. Receiving and Processing Orders
- Orders will appear in your vendor dashboard.
- Click the order ID to open.
- Use the Shipment & Label section to ship orders
- Customers will get email alerts for every process
- Fulfill orders promptly and mark them as “Completed” once shipped.
b. Managing Shipping
- The platform uses EasyPost shipping by default with live rates and delivery times.
- You can also set up yours to be shown alongside
- Set up shipping methods and rates for your products.
- Add shipping rates by countries or states.
6. Communication with Customers
a. Responding to Messages
- Check your dashboard for customer messages.
- Respond promptly and provide helpful information.
b. Handling Customer Reviews
- Encourage customers to leave reviews.
- Respond to reviews, both positive and negative, in a professional manner.
7. Earnings and Payouts
- Monitor your earnings through the dashboard.
- Set up your preferred payout method for receiving earnings.
8. Announcements
Keep informed about the latest news and updates from admin using the Announcements feature.
- Navigate to the “Announcements” section.
9. Coupons and Discounts
Attract customers and boost sales by offering coupons and discounts on your products.
- Access your vendor dashboard.
- Go to the “Coupons” section.
- Click on “Add New Coupon.”
- Configure the coupon details, including the code, discount amount, and validity period.
- Apply restrictions if necessary (minimum purchase amount, specific products, etc.).
- Save the coupon and promote it to your customers.
10. Withdrawals
Withdraw your earnings from the marketplace using the Withdrawals feature.
- Log in to your vendor dashboard.
- Navigate to the “Withdrawals” section.
- Click on “Request Withdrawal.”
- Enter the withdrawal amount and select your preferred payment method.
- Provide any necessary details for the payment method.
- Submit the withdrawal request.
- Once approved, you’ll receive your earnings through the chosen payment method.
11. Tips for Successful Selling
- Use high-quality images and detailed product descriptions.
- Offer competitive prices and occasional promotions.
- Engage with customers through social media and newsletters.
12. Troubleshooting and Support
- If you encounter any issues, refer to the Dokan documentation.
- Contact Dokan support for technical assistance.
13. Conclusion
Congratulations on setting up your store on Culturesquare stores, you’re well on your way to becoming a successful online seller.
.